CB Rotator, Links and Action Pixel
Setting Up Outgoing CB Rotator
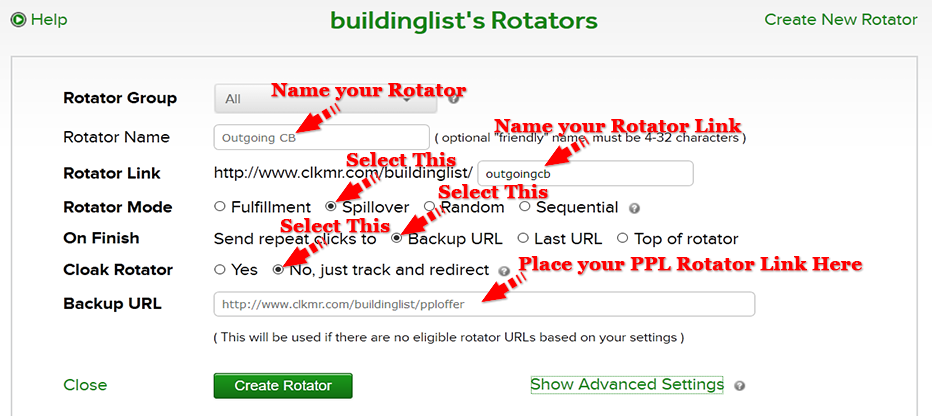
Follow Step #1 to Step #7 on setting up “Affiliate Rotator”
Step #8 – On “Backup URL”, grab your “PPL Offer Rotator link”, then place it here.Step #9 – Once complete, Click on the “Show Advance Setting”Step #10 – On “Geo Targeting” Select “All Countries”Step #11 – Once complete, Click on the “Create Rotator” Button
Once complete, the rotator should look exactly like below
Populating “Outgoing CB” Rotator
Outgoing CB Rotator is where you populate with your CB partner’s tracking link. When your CB partner give you his tracking link, eg. Link: http://yourcbpartnerlink.com
Step #1 – Click on the “Rotators” on the top
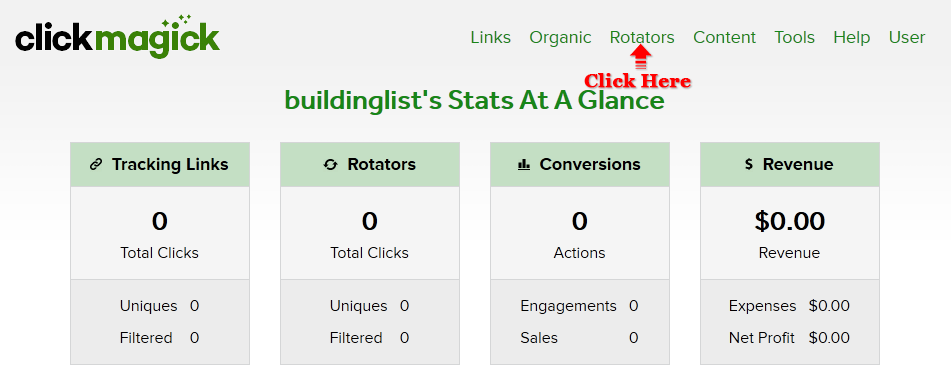
Step #2 – Click on setting symbol far right same row as “Outgoing CB” as shown below.
Once you click on the setting symbol, a small menu will pop up. Select and click on “Add URL”

Once you click on the “Add URL”, it will expand as shown below

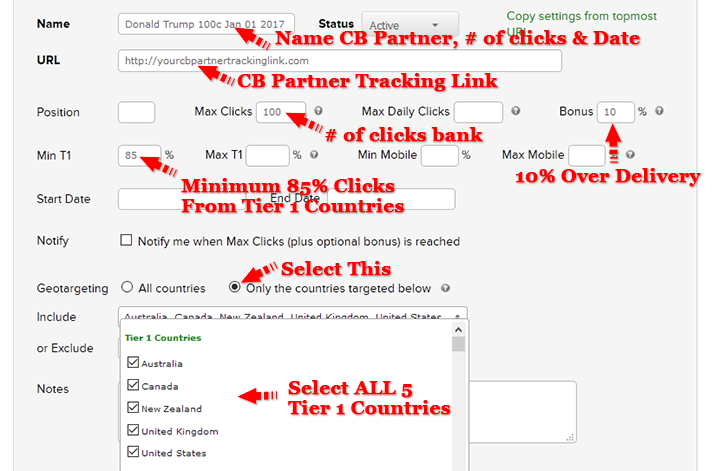
Step #3 – On the “Name” Put your CB Partner Name & Date
Example: If you click bank with “Donald Trump” put it as Donald Trump 100c Jan 01
Step #4 – On the “URL”, copy the tracking link from cb partner and paste itStep #5 – On the “Max Click” put 100 if you made a deal with your CB partner to bank 100 clicksStep #6 – On the “Bonus” put it 10% – Normally we over deliver by 10%Step #7 – On the “Min T1” put is as 85% if you made a deal with your CB partner to send 85% Tier 1 countries
Once you click on the “Add URL” you will see 1/1 under the URL
Continue to add minimum 5 CB partners using step #1 to step #7
Setting Up “Incoming CB” Link
Incoming CB Link is where you populate with your Landing Page/Optin Page/Squeeze page link. You give this link to your CB partner to send you the clicks or to Solo Ads Vendor when you buy clicks.
Let’s Proceed…
Step #1 – Click on the “Links” on the top menu.
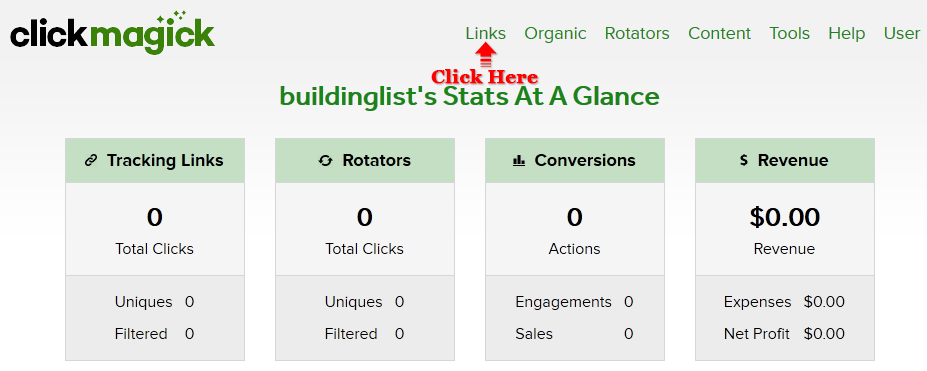
Step #2 – Click on the “Create New Link” to create a new Link for your CB Partner or Solo Ads Vendor to send you the clicks

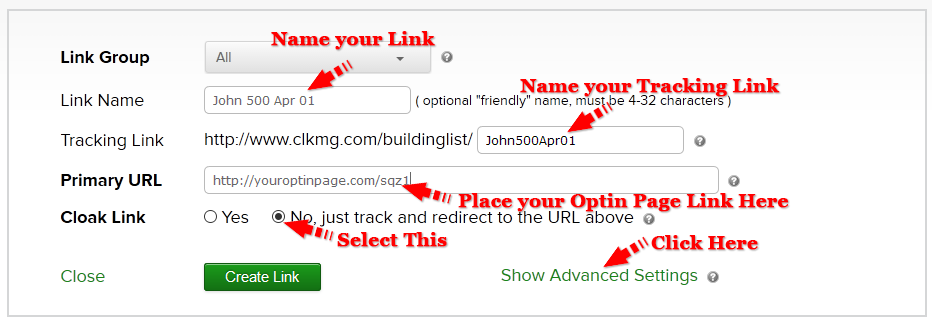
Step #3 – Fill in the “Link Name” – Usually I will fill in my CB Partner’s name + Number of clicks agreed + date.
Eg. If I bank or buy from John 500 clicks on April 01: I will put it as John 500 April 01
You can put whatever you like as long as you know who you are banking or buying from and how many clicks
Step #4 – Fill in the “Tracking Link” as “John500Apr01” or anything you prefer.Step #5 – Fill in the “Primary URL” – this is where you put your landing/optin/squeeze page URL.Step #6 – On the “Cloak Link” select “No, just track and redirect to the URL above”
Once complete click on the “Show Advance Setting” link & it will expand.
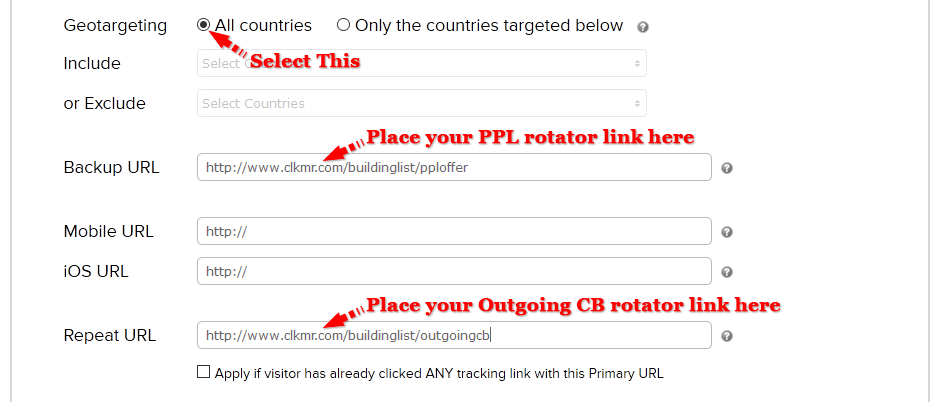
Step #7 – On the “Geotargeting” select “All Countries”Step #8 – On the “Backup URL” place your “PPL Rotator” link.Step #9 – On the “Repeat URL” place your “Outgoing CB Rotator” link.Step #10 – Once complete click on the “Create Link” button.
Step #11 – Click on the “Link Name” in this case it’s “John 500 Apr 01”. Once clicked, it will expand.Step #12– Look for “Tracking Link”Step #13 – Copy the whole URL and give this link to your CB partner

Note:
- TC = Total Clicks / Raw Clicks
- UC = Unique Clicks
- UC = Unique Clicks
- A = Action (Optins)
- ACR = % of Optins
IMPORTANT!
For the 2nd, 3rd 4th and so on for “Incoming CB Link” just follow Step #1 – Step #13
Please read through a few times to understand what is being shown to you. IF you still do not understand or if you have any questions, please do not hesitate to contact me and I will do my utmost best to help you.
Gratz! You’ve created your Incoming CB Link!
Setting Up Action Pixel/Tracking Pixel
The purpose of tracking pixel is to track Optins, Engagements or Sales. In our case, we would like to track optins.
Let’s Proceed…
Step #1 – Click on “Tools” on the top menu, then mouse over on”Tracking Pixel” and click on “PixelBuilder”
![]()
Step #2 – You will be taken to “Tracking Pixel Builder”
- 2a – On What do you want to track? Select “Action”
- 2b – On Conversion Attribution Select “Last Click”
- 2c – On Do you want to track duplicate conversions? Select “No”
- 2d – On Are you adding this pixel to a secure https:// page? Select “No” if your site in not secured or select “Yes” if your site is secured
- 2e – On Are you adding this pixel to a tracking link? Select “No”
- 2f – On If you want to add an optional “Ref” value, enter it here … Leave it Empty
- 2g – On Action Tracking Pixel Select “Image/HTML”
- 2h – Copy the whole URL and paste it at the bottom of your “Thank you” page before </body>
![]()
Gratz! You’ve successfully created your tracking pixel
MODULE 1
List Building Strategy
- Introduction
- ClickBanking
- Setting Up Funnel
- Banking: The Real Fun Begins
- FB Group: Testimonial, CB & Solo Ads
MODULE 2
Setting Up ClickMagick
- Registering ClickMagick Account
- Setting Up Rotators
- Populating Rotators with Offers
- Setting Up CB Rotator, Links and Action Pixel
MODULE 3
Setting Up Aweber
- Registering Aweber Account
- Creating Aweber List
- Creating Aweber Webform
- Creating Buyers List And List Automation
- Creating First Follow Up Series
CLAIM YOUR FREE DONE FOR YOU FUNNEL SETUP HERE
THE BAIT
FREE BUYERS LIST

